After making good progress with the Dragon Princes during my lunches I decided to bring them all home with the aim of getting some work done on them during the two weeks I'd got booked off over Christmas and New Year.
Of course, with all the time needing to be spent getting the lounge cleared up for Christmas day, plus doing my part looking after the kids, and adding in several evenings when I got nothing done due to being half asleep due to baby-induced sleep deprivation, the closest I actually got to hobby was moving my tray of in progress stuff from the lounge into the back bedroom out of the way.
Actually, I tell a lie. I did also attempt to make a start on converting some of my broken spearmen into command models, only to spend about 15 minutes going through my boxes until I realised the models in question were actually in the shed, and I was damned if I was going to trek out to the shed at night in freezing temperatures to dig them out.
Showing posts with label 8th Edition. Show all posts
Showing posts with label 8th Edition. Show all posts
Monday, 16 January 2017
Tuesday, 6 December 2016
November 2016
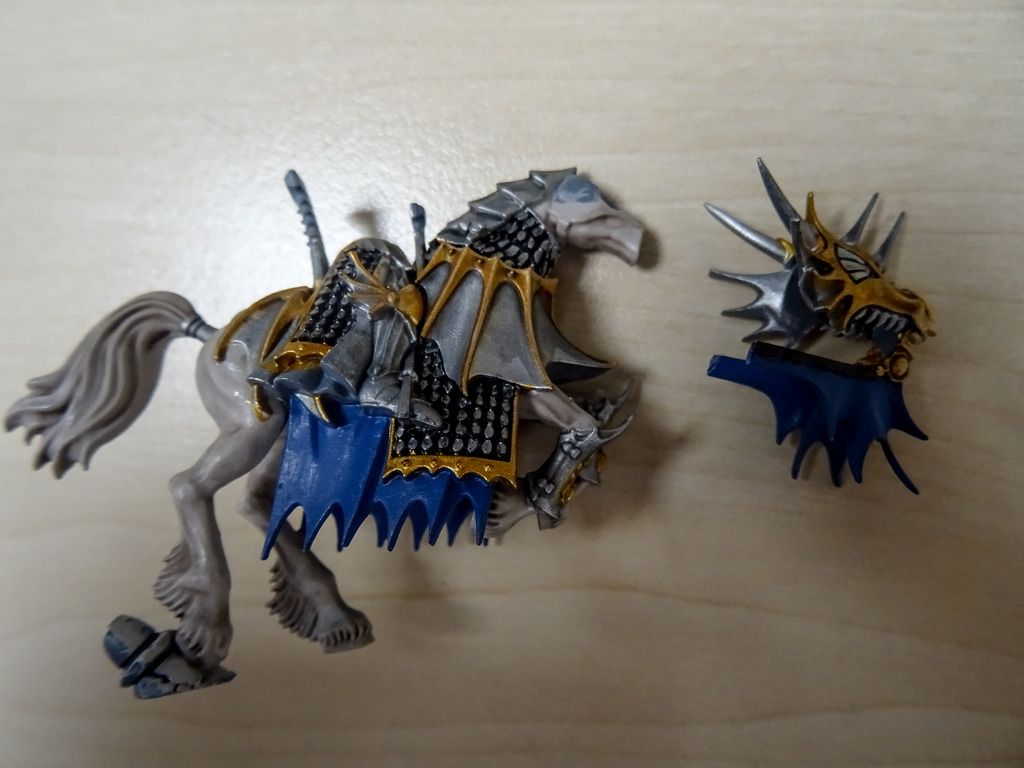
Well I said it last time round but then realised after posting the August & September update just how many horses I'd got left that needed the basics doing, but this time I finally feel like I'm over the hump with my Dragon Prince horses.
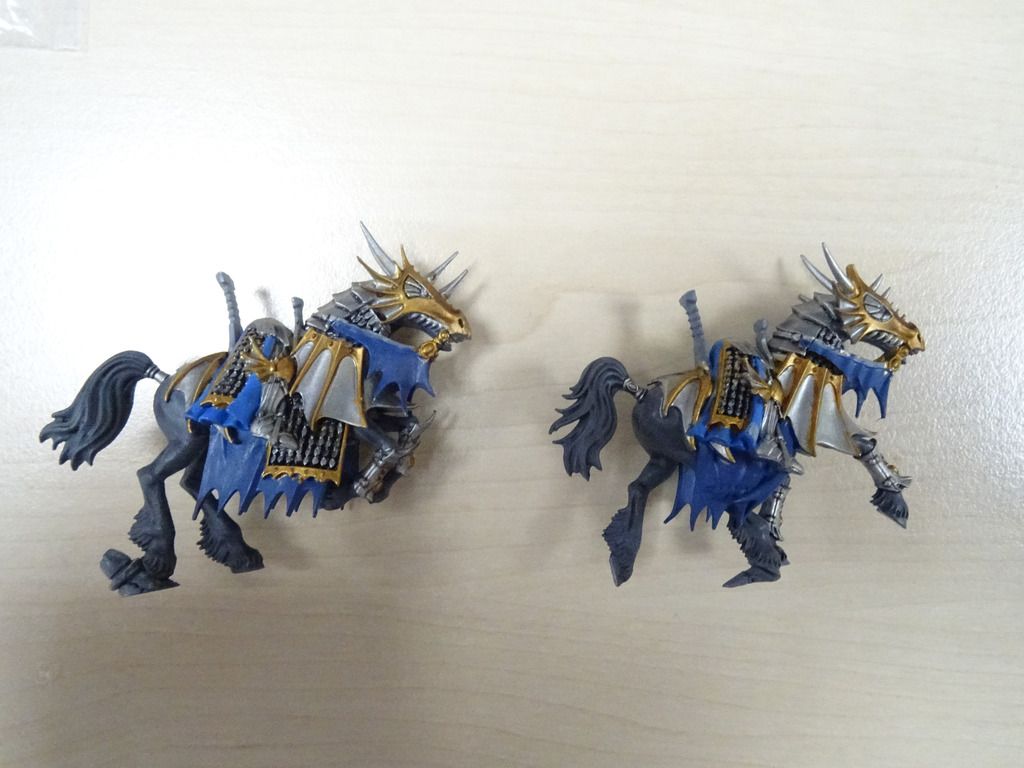
Having decided I'm going to stick with three colours for my horses I'm just about done on the grey horses. Aside from the leather and cloth I just need to do a bit of touching up on the horseflesh from the other work that's been done before I need to start thinking about sticking on bodies and basing. After that I think I'll just need to paint the banners to finish the unit, barring one shield which I've ordered this week.

Next up I should really see about getting one or two of my monsters progressed. One of my dragons is in bits that should be easily transportable to work for painting so I plan to dig that out and bring it in once the DPs are finished.
After that, or in parallel if I can make the time at home, I'll need to get round to making up my command models for my archer and spearmen units. If I can do that I can finally start selling off my metal models to generate some cash (although at the moment I'm not sure if I have the will to plough it back into a new army or additional units for this army).
Saturday, 8 October 2016
August & September 2016
It feels like I'm almost entering the last stretch with the Dragon Princes.
Barring a symbol or something to be painted on the two banners and assembling all the individually painted parts, I think I'm done with the torsos. That means I'm now onto the horses. I've already got about 10 or so whose flesh is painted to an acceptable standard, leaving 20 more to do the flesh on, followed by the armour and cloth. I'm going to need to take a closer look at the horses I've already done the flesh on as although I know I've basecoated them I'm not sure how many have had the wash and highlight treatment.
From my progress this week and last I'm starting to think I could really do with a much wider brush for getting my basecoats on (especially as I'm still not sure about forking out for an airbrush without having any idea how much use I'd actually get out of it). The main brush I'm using at the moment is a 4, or at least far as I can tell from what markings on the handle haven't rubbed off. Given how many large areas there are to apply paint to, I'm sure I'd be able to drastically reduce the amount of time needed to apply a base layer with a wider brush, even if I was going have to go back into some crevices with the 4 to make sure everything is covered.
Anyway, I'm trying to figure out what painting I can do at home that will help reduce the amount that needs doing at work. Currently it's looking like about the only thing I can do that won't lead to needing to be too careful is painting the base layer of horse armour and the rider's legs. As I managed to find a rare few minutes to do some painting at home this weekend I touched up the base coat of Ironbreaker on some of the horses that are in the queue for flesh painting and also started work on painting my Repeater Bolt Throwers, since as they're assembled they should be reasonably quick to paint. I say "reasonably quick" as I'd just glued them together without considering how I was going to be painting the bolts, which look like they're potentially going to be a pain on the two that have the six-bolt configuration.
So that I can cross the bolt throwers off my list of units that need to be built and finished I need to get on with building the crews. As I'm kit bashing them one of the first priorities is making sure I've got the parts I need as I've a suspicion that I needed an extra arm or two but can't recall for definite.
When the bolt throwers are done I then need to find time when I'm at home to work on getting some of my other models built. I should probably look at sorting out some of my monster and chariot kits first before shifting on to my units of White Lions that I'm currently using three of my cardboard storage boxes to house models in various state of clean up and construction, although my absolute priority should probably be converting up/kit bashing some command models for my archers and spearmen so I can start thinking about finally selling off my metal models, which I've been loathe to do until I've got plastic equivalents of everything I'm currently using (which is one of the reasons why I've been trying to sort the Dragon Princes out as they've been used quite often in any games I've had of over 2000 points)
Friday, 27 November 2015
Raze and Ruin 2015 Part 3
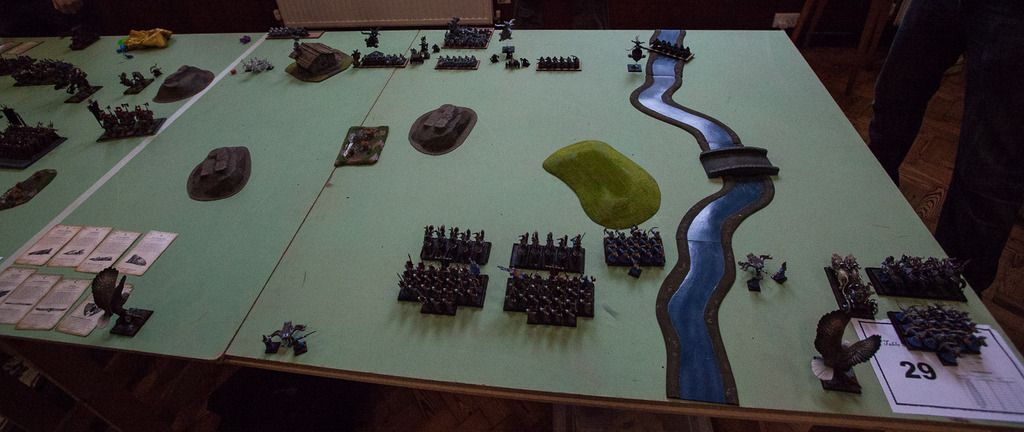
Game 4 – Will Dunn – Dwarfs – Dawn Assault
After my defeat to
Dwarfs in game three I was rewarded with another game against Dwarfs in game
four on table 29 (just one above the bottom).
Will’s list was more of the expected gun line Dwarfs so despite my
experience against Terry, I wasn’t expecting any vanguard moves except possibly
for a couple of the Gyrocopters.
This game was a
teensy bit of a struggle for me in terms of note taking as I kept getting
Will’s Quarreller and Thunderer units mixed up.
I think I’ve sorted it out in the report in the end but if there’s a
couple of bits relating to those units that doesn’t make sense, that’s why.
Grim Burloksson
Runesmith
Thane
- Battle Standard Bearer
14 Thunderers
- Champion
- - Brace of Pistols
- Musician
12 Quarrellers
- Musician
12 Quarrellers
- Musician
12 Quarrellers
Gyrocopter
- Vanguard
Gyrocopter
- Vanguard
Gyrocopter
34 Slayers
- Musician
Cannon
14 Irondrakes
- Standard
- Musician
Organ Gun
Organ
Gun
Spells
Archmage - Lore of
High Magic
1 – Soul Quench
2 – Walk Between
Worlds
3 – Tempest
4 – Fiery Convocation
Archmage – Lore of
Light
1 – Pha’s
Protection
2 – Net of Amyntok
3 – Banishment
4 – Birona’s
Timewarp
Deployment
This game was something of a novelty as it was played on a
table with a river running down the table on the right hand side as I looked at
it, starting about a foot from the right board edge at Will’s end, coming in to
about eight inches from the right edge as it hit the middle of the board, and
then back out to about a foot from the right edge when it hit my long board
edge. The river had a bridge over it
midway up the board.
Other scenery on the board included a hill about eight
inches from the left board edge and just inside my half of the table. There was a building slightly straddling
Will’s deployment zone line parallel with this hill. The next scenery was a bit
of marsh and another hill about six inches further on and just inside Will’s
half of the table. Finally there was a
hill in my half of the table a couple of inches to the left of the river.
For this game we were back to a funny deployment scenario. Rolling for his units Will ended up with an
Organ Gun and a unit of Irondrakes in his left corner, the Irondrakes taking up
residence in the building. The bulk of
his army ended up in the central zone; in line there were the Thunderers with
the BSB, the other Organ Gun, a unit of Quarrellers, the cannon and another
unit of Quarrellers.
Behind
this front line there was a Gyrocopter behind the Irondrakes, Grim Burloksson just behind the
Organ Gun with the Slayers behind and to the right of him and a second Gyrocopter
behind the cannon.
In the right corner was the last Gyrocopter and the last
unit of Quarrellers, who deployed in the river.
My deployment ended up being not too dissimilar to what I
would have planned had it been a normal deployment. In my left corner there was just an
Eagle. In the other corner there was the
second Eagle close to the board edge, one of the bolt throwers, the Lion Chariot,
a unit of Reavers and a unit of Archers.
In the centre, in a line to the left of the river, was the
other Archer unit and then the remaining two Reaver units, behind whom went the
Swordmasters – the unit with the Razor Standard on the left and the unit with
the flaming banner on the right. The
Light Archmage went with the left unit while the BSB and general went with the
unit on the right. Finally the remaining bolt thrower was right back on the
board edge about 28” from the left board edge.
With vanguard moves Will moved the Gyrocopter on the right
out the full 12”, effectively stopping my Reavers on the right being able to
vanguard themselves, and the Gyro on the left moved out towards the hill in my
half of the table. I was able to push
the Reaver units in the middle of the table forward.
Game
The Dwarfs had the first turn and the Gyros moved up, with
the one on the right carrying our a bombing run on the bolt thrower on that
side, killing the crew and causing the Great Eagle to panic off.
In
the centre of the table the Gyrocopter there shot its steam gun at the Reavers,
killing one. Grim Burloksson used his ability to extend the range of
shooting for the nearby Quarrellers, giving them range to hit the remaining
bolt thrower and kill one of the crew.
The left unit of Quarrellers shot at the depleted Reavers and killed the
remainder, while the other unit shot at the Reavers in the centre but failed to
kill any. Finally the cannon shot at the unit of Swordmasters on the left,
killing three.
For my first turn I pushed
forwards with the Swordmasters moving in line with the Archers to the left of
the river who moved up onto the hill. On
the other side of the river the Reavers moved up towards the flank of the Quarrellers
in the river with the Lion Chariot moving up as quickly as it could behind
them. The Archers wheeled to draw line
of sight on the nearby Gyrocopter.
In the magic phase the general
attempted to cast a boosted Walk Between Worlds on his unit but failed to meet
the casting value. To compensate
somewhat, the Light Archmage managed to cast a boosted Birona’s Timewarp. On the right the Archers shot at the
Gyrocopter but could only do one wound to it.
The other Archers and the Reavers on the right shot at the damp
Quarrellers, killing four between them.
The other Reavers, who’d marched right up in front of the central Quarrellers,
managed to shoot one dead for their troubles while bolt thrower killed three
Irondrakes.
Dwarf turn two kicked off with
the Gyrocopters moving round for shooting positions and bombing runs and the
Irondrakes wheeled to face where my Swordmaster units could be expected to end
up after their next movement phase. The
Slayers also wheeled round to face towards the Reavers menacing the central Quarrellers.
The central Gyrocopter’s bombing
run ended in a mishap with the bomb misfiring as it flew over the Swordmasters,
causing it a wound. The Gyro on the
right bombed the Archers there, causing them to flee 6” towards my long board
edge.
Shooting saw the most advanced
Reaver unit shot down to the last elf. Burloksson’s
special ability was put to use to extend the range of the nearby Quarrellers
who proceeded to shoot off a rank of the Archers on the hill. The cannon targeted the left unit of
Swordmasters again but misfired.
High Elf turn two saw my
surviving Eagle charge the central Gyrocopter while the Reavers on the right
changed into the flank of the Quarrellers who were struggling to keep their
heads above water. With the effects of Timewarp in place both Swordmaster units
made the most of their potential 20” march range to move right up into the
faces of the other Dwarf units, while the Archers on the hill moved to the
other end of it. The lone Reaver had
moved out of the way of the Swordmasters
and positioned himself to prevent a flank charge by the Thunderers. Meanwhile,
the fleeing Archers had rallied.
Magic saw the general try and
cast Tempest on the Slayers but this drew out a Rune of Spellbreaking. A bubbled Pha’s was dispelled with all the
Dwarf dispel dice leaving just Khaine’s Ring of Fury to unleash at the
Quarrellers ahead of the Swordmasters on the left, which killed two.
In the shooting phase the bolt thrower tried to gun down one
of the Gyrocopters but firing a single bolt saw it miss. The Archers on the hill shot at one of the
Quarreller units and managed to kill one of their number. In combat the Reavers beat the Quarrellers
but the unit held. The Eagle surprised
me by beating the Gyrocopter (albeit only through having charged, with neither
combatant managed to land a blow on the other) but then failed to run it down
as it fled, ending up an inched behind it.
Unsurprisingly, the Gyrocopter rallied in Will’s third turn
while the other Gyro in the middle of the board positioned itself to take an
interest in the Eagle or Archers on the hill.
The remaining Gyrocopter positioned itself on the flank of the recently
rallied Archers. The cannon crew decided
they didn’t like the look of the Swordmasters bearing down on them and
retreated behind the Quarrellers while the Slayers moved as far forwards as
they were able with the units nearby.
The Irondrakes exited the building.
In my right corner the Gyrocopter shot its steam gun at the
Archers, killing three but the unit held its nerve, unlike the unit on the hill
who took four casualties and fled towards the river. The Irondrakes shot down the Reaver on the
left. The Dwarf shooting then
concentrated on the Swordmasters on the left, killing 12 of the unit. In contrast, the unit on the right took only
two casualties.
Combat saw the Reavers overcome the Quarrellers in the river
and run them down. With the Quarrellers
now out of the way the Reavers charged the
cannon at the start of turn three as my Swordmaster units charged the
Quarreller units in front of them – the unit on the left taking two more
casualties from the Stand and Shoot reaction before making their charge. Elsewhere the fleeing Archers rallied while
their compatriots in the right corner moved forwards away from the board edge
and the last Eagle and Lion Chariot moved up.
In the magic phase the general successfully cast Fiery
Convocation on the Slayers which only killed six. The Light Archmage then attempted to cast a
bubble Timewarp but failed to reach the required casting value.
The Archers in my right zone shot at the central Gyrocopter,
managing to do one wound to it while the bolt thrower fired a volley at the
Thunderers but could only kill one.
In the combat phase the Dwarf crew failed to put up much
resistance to the Reavers’ spears but one was left cowering under the machine
at the end of the combat, preventing the Reavers from getting an overrun into
the Slayers. Despite being outmatched
and failing to cause any wounds to the Swordmasters, the Quarrellers on the
left also held on, again preventing the Swordmasters from getting an overrun
into the Slayers. The other Swordmasters
were not so stymied by the Quarrellers they were fighting and cut them down
before reforming to face the Slayers.
As I expected, the Slayers charged the Swordmasters in front
of them while the Thunderers rushed in to save the Quarrellers. The Irondrakes carried on moving round while
the central and right hand Gyrocopters moved into position to steam the Archer
units. The third Gyro had charged the
remaining bolt thrower. In case it might
have any effect on the battle Will started moving the Organ Gun in the left
zone round the building.
The unit of Archers in the right zone survived the
attentions of the nearby Gyrocopter for this turn but the unit further up the
table were not so bold and fled after taking four casualties.
With Dwarfs in the front and flank the Swordmasters on the
left did only two wounds and took three wounds in reply, leaving just the
Archmage standing. The Slayers killed
seven Swordmasters but not before they’d taken ten wounds themselves. Finally the Reavers finished off the cannon
crew.
In what was to be my final turn
of the game I charged the now free Reavers into the flank of the Quarrellers in
the multiple combat. The Lion Chariot
and Great Eagle moved up to look like they might be thinking about getting
involved with things.
Magic saw the Light Archmage
case a bubbled Pha’s while the general cast Walk Between Worlds on the Lion
Chariot, mainly for the Shield of Saphery boost. He also cast Fiery Convocation on the
Irondrakes for the same reason. At least
that’s what he said after not managing to kill any. Finally the Light Archmage tried to cast
Timewarp on the Swordmasters but this was stopped.
The Archers in the corner shot
at the Gyro hovering near the bridge doing the last wound to it. It was then on to combat. To my surprise and relief the Archmage
fighting the Quarrellers and Thunderers survived and the elves won the combat,
although it was a case of handbags at dawn with neither side causing a
wound. In the other combat the
Swordmasters killed 12 Slayers, losing nine of their number in reply.
The scores as totalled up then
gave Will a 11-9 win. Annoyingly, while
reading up on various magic items, runes etc when writing these reports, I
realised the result should have been a little different.
Will had the Master Rune of
Grungni on his BSB and on the turn I cast Fiery Convocation on the Slayers he used
the ward save from that to roll save six Slayers from the spell’s effects. However, on reading the rules for this rune,
it gives a ward save against shooting and magic missiles. Convocation is a direct damage spell and so
the ward save wouldn’t apply.
With the extra six slayers that
should have been dead from the spell by the time the Swordmasters fought them
in the last turn they would have been wiped them out, rather than having six
left standing. That would have given me
an additional 418 points, turning the game from a 11-9 loss to a 10-10
draw. Not an earth-shattering difference
I don’t think in terms of the final standings but a better result on a personal
score and might have given me a different match up in the last game.
I don’t think this was a deliberate attempt to cheat by
Will. In truth I don’t think he’d been
playing Dwarfs all that long as his army was nearly all unpainted barring the
undercoats.
Game 5 – Joe Sutton – Tomb Kings – Battle
Line
It had taken me
four games but here I was in the last
game on the last table. This time
though, I was there because the only person with a lower tournament score than
me had already played Joe, who was the spare player for the event.
This was, in fact,
only Joe’s sixth game of Warhammer in several years, not that I expected this
to be a pushover by any means considering the huge unit of Skeleton Archers I
had to contend with. This was also only
my second ever game against Tomb Kings so this was still going to be a case of
trying to turn theory-hammer into practice.
Liche High Priest
- Level 4 Wizard
- Lore of Nehekhara
Tomb Prince
- General
- Great Weapon
Tomb Prince
- Great Weapon
Liche Priest
- Level 2 Wizard
- Lore of Death
Liche Priest
- Level 2 Wizard
- Lore of Death
6 Chariots
- Standard
- Musician
52 Skeleton Archers
- Full Command
28 Tomb Guard
- Full Command
3 Sepulchral Stalkers
3 Carrion
Screaming Skull Catapult
Screaming Skull Catapult
Casket of Souls
Casket
of Souls
Spells
Archmage - Lore of
High Magic
1 – Soul Quench
2 – Apotheosis
3 – Walk Between
Worlds
4 – Fiery
Convocation
Archmage – Lore of
Light
1 – Shem’s Burning
Gaze
2 – Net of Amyntok
3 – Banishment
4 – Birona’s
Timewarp
Liche High Priest
1 –Djaf’s Incantation of Cursed Blades
2 – Neru’s Incantation of Protection
3 – Ptra’s Incantation of Righteous Smiting
4 – Usekhp’s Incantation of Desiccation
Liche Priest
1 – Spirit Leech
2 – Doom and Darkness
Liche Priest
1 – Spirit Leech
2 – Doom and Darkness
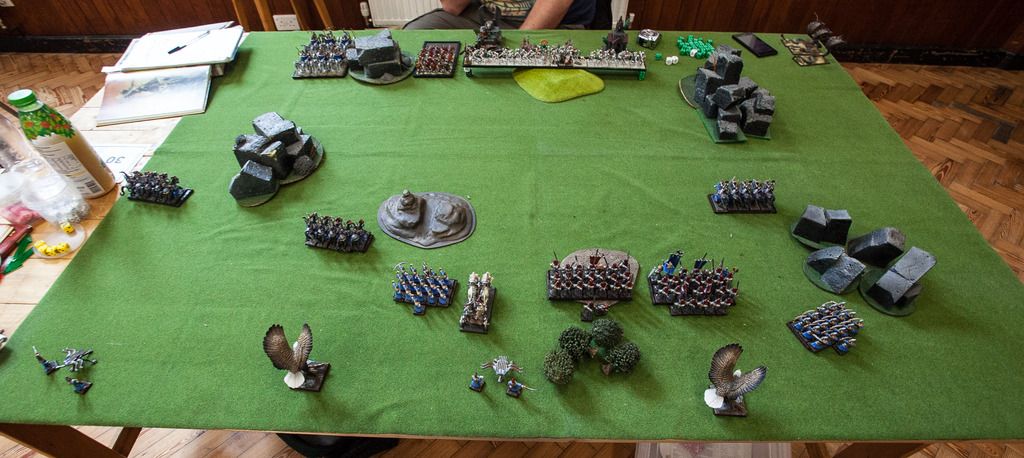
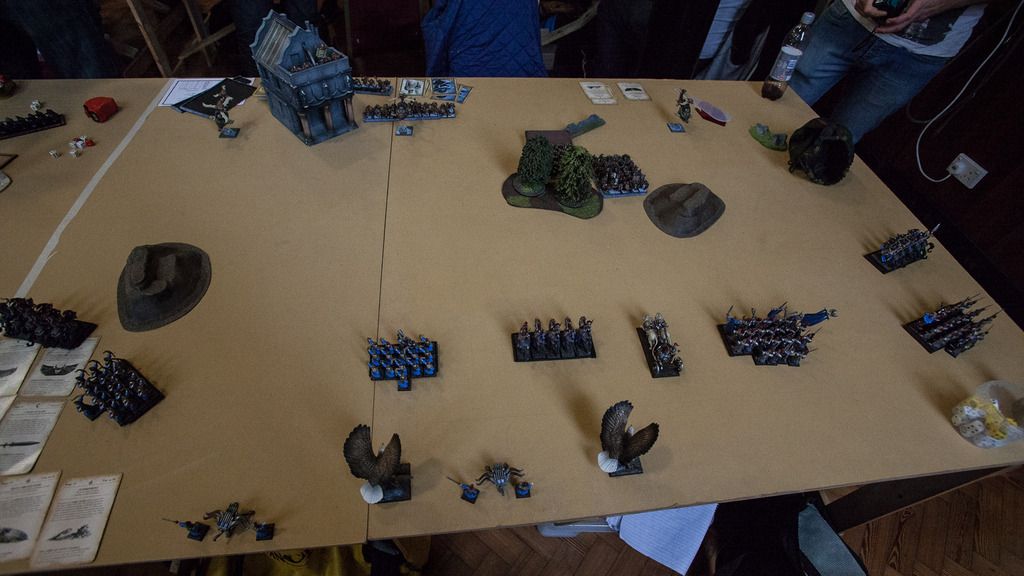
Deployment
There was a large piece of impassable terrain nine inches
from the left board edge and extending from a couple of inches in Joe’s half of
the table to about six inches into my half.
Also in no-man’s land in my half of the table there was a hill eight
inches on from the impassable terrain and halfway to the midline and finally a
group of impassable blocks of stone about 10 inches from the right edge and in
front and slightly straddling my deployment line. Likewise in Joe’s half of the table there was
another large area of impassable about a foot from the right edge and
stretching from his deployment line almost to the mid line.
In Joe’s deployment zone proper there was a smaller chunk of
impassable about 14 inches from the left and just touching the deployment line
and a hill midway along the deployment zone and on it’s edge. In my zone was a wood just to the right of
the centre.
Other than his Stalkers, which started the game entombed,
Joe’s army basically deployed in a line with the chariots to the left of his
impassable terrain and the Tomb Guard to the right of it. Next up were the Skeleton Archers, deployed
25 wide with the Carrion and Screaming Skull Catapults behind them.
Joe deployed his characters in the Tomb Guard and skeleton
archers – one Liche Priest in each unit with the Prince and Liche High Priest in
archers.
For my part I had a unit of Reavers three inches from the
left board edge with another unit about eight inches further on. One of the Archer units was another five
inches on with the Lion Chariot next to them.
The Flaming banner Swordmasters were in the wood while the other unit
went next to them, along with all my characters. In the remaining gap between the Swordmasters
and the impassable terrain I put my last unit of Reavers with the Archers
behind them. Along the back of board
edge I had a bolt thrower behind the first unit of Reavers, an Eagle behind the
next unit of Reavers, the second bolt thrower behind and to the right of the
Lion Chariot and finally the last Eagle behind the Swordmasters containing my
characters.
With vanguard moves I pushed the Reavers on the left and
right up almost the full 12 inches, with the middle unit advancing only three
or four inches.
Game
The Tomb Kings went
first and declared the first charge of the game by the chariots on the Reavers
on the left, who stood and shot, causing one wound. The Reavers’ confidence in staying put was
rewarded as the chariots failed their charge and moved only two inches. The Tomb Guard and archer units moved
forwards, as did the Carrion, who hopped over the archers.
In the magic phase
Joe Succeeded in casting Doom and Darkness on the unit of archers on the left
and then irresistibly cast Righteous Smiting on the archer block, losing a
wound from each of his wizards.
Shooting saw one
Screaming Skull Catapult misfire while the other targeted the Swordmasters on
the right and scatter onto the nearby Archers, killing five. The archers took aim at the Reavers on the
right, shooting the unit to pieces.
Keen to endure as
few monstrous volleys as possible I marched both Swordmaster units at full pelt
towards the skeleton archers in my first turn.
Both archer units moved up into better shooting ranges while Eagle on
the right and the Lion Chariot moved up in support of the Swordmasters.
The general
attempted to cast Fiery Convocation on the skeleton archers but failed to meet
the casting cost by two, leaving Joe all his dispel dice with which to stop
Birona’s Timewarp, although according to my notes he scrolled it, so I must
have rolled quite high for the casting roll (annoyingly I haven’t noted the
total roll down).
My shooting was
pretty ineffectual with one of the bolt throwers managing to knock down a Tomb
Guard and one of my archer units shooting down a skeleton archer.
In the second turn
the chariots thought better of trying to charge the Reavers on the left and
instead started moving into the centre.
The Tomb Guard moved further forward while the Carrion moved to
march/charge block the Swordmasters on the left. The Stalkers were brought up on the left to
threaten the Reavers who were being ignored by the chariots.
This time it was my
turn to use my scroll as I acted to stop Smiting being cast on the Archers
again. Doom and Darkness was cast on the Archers on the left again. Both caskets went off although the damage was
limited to the archers on the left. A
Screaming Skull Catapult misfired again as the Tomb King shooting again
targeted the Swordmasters, although the second machine managed to put a wound
on my BSB. The archer block targeted the
Swordmasters on the right and managed to kill five while the Stalkers’
Transmogrifying Gaze killed one Reaver of the unit in front of them. However,
one Stalker killed itself with it’s attack.
With not much
choice in the matter, considering I wanted to get my combat units in position
for a third turn charge into the skeleton archers, I charged the Lion Chariot
and Swordmasters into the blocking Carrion in my second turn. The unit of Swordmasters with my characters
in moved forwards at full speed, with the archer unit on the right marching up
behind them since they were going to be shooting with enough modifiers to make
it not worth their time this turn. On
the left the Reavers skipped round the Stalkers to face the rear of the
unit. The middle unit of Reavers moved
back out of charge range of the chariots while the Archers moved back as
well. The Eagle on the left moved to the
edge of the hill in case it might be required in future turns to fly in front
of the Tomb Guard or chariots while its colleague on the right flew out to the
far end of the impassable terrain.
In the magic phase
the general’s attempt to cast Fiery Convocation drew out all of the Tomb Kings’
dispel dice, leaving the Light Archmage able to cast Timewarp on the general’s
unit of Swordmasters.
Shooting was poor
once again with one Tomb Guard being felled by a shot from a Reaver and one
Stalker taking a wound from a volley from the left bolt thrower. In combat the Lion Chariot wiped out the
Carrion with its impact hits and reformed to face the Tomb Guard and Archers
while the Swordmasters overran five inches.
Joe’s turn three
saw the Stalkers move forwards and the chariots reform to face the Reavers
while the Tomb Guard wheeled to face towards the left hand unit of
Swordmasters. I managed to stop Doom and
Darkness going through again this turn but Joe was able to push Smiting through
irresistibly on the archers. He rolled
an eight for the miscast result, killing his Liche Priests.
The chariots shot
at the Reaver but only killed one. The
skeleton archers unleashed at the Swordmasters on the right, killing 10. One Screaming Skull Catapult shot at the same
unit but the magical skulls failed to get past the Banner of the World Dragon’s
ward save. The other catapult targeted
the Lion Chariot but the attack scattered off.
It was now or never
time as both Swordmaster units and the Lion Chariot charged into the skeleton
archers while the Reavers on the left chanced their luck by charging into the
rear of the Stalkers. The Eagle on the
left moved out to block the Tomb Guard while the central Reavers moved to the
front edge of the hill. I completely
forgot to move the other Eagle.
With only a five
dice phase I threw all the dice at a boosted Timewarp which Joe was unable to
stop. My shooting was, yet again,
nothing to write home about as the archers on the right, the left bolt thrower
and the Reavers shot down a Tomb Guard apiece.
In combat the
Reavers caused two wounds to the Stalkers which, combined with the crumble test
wiped out the Stalkers and allowed the Reavers to overrun out of the way of the
chariots. The Tomb Prince called out a
challenge which was met by one of the Swordmaster champions who did a wound to
the undead royal before being slain himself.
The Swordmasters and Lion Chariot caused a further 33 wounds to the
archers while losing four rank and file Swordmasters from each unit in reply. Unsurprisingly, the archer unit an the
characters within crumbled, with one of the Screaming Skull catapults also
destroyed due to Crumble. The
Swordmasters on the right overran into a Casket of Skulls while the unit on the
left didn’t quite manage to make it into the remaining catapult and the Lion
Chariot was on the far side of the hill after the catapult it had overrun into
was destroyed by the Crumble.
Tomb King turn four
saw the chariots reform and move up alongside the Tomb Guard. The Caskets tried to fire and I could only
stop one, with the effects of the other putting three wounds on the Lion
Chariot and killing two from the Swordmasters on the left. The last catapult shot at the Eagle on the
left but it scattered off, while the chariots shot at the middle Reavers and
killed one.
I think we may have
forgotten to do the combat with the Swordmasters and Casket as it was still
there next turn and I’ve not made any notes as to what happened.
High Elf turn four
and the Swordmasters on the left charged the nearest Casket while the Lion
Chariot charged the remaining Screaming Skull Catapult. The left hand Reavers moved back out to the
left so they could shoot the chariots while the Archers on the left sidestepped
to give themselves better line of sight to the Tomb Guard and chariots.
Magic saw the
general try and cast Apotheosis on the BSB but this was dispelled. He was, however, successful in casting Walker
Between Worlds on the unit of Archers on the right, allowing them to move up
into better range. Shooting went a bit
better this turn with the Reavers on the left chipping two wounds off the
chariots, while the bolt thrower on the right managed to squeeze a shot through
a take the last wound from a chariot.
The bolt thrower on the left shot down four Tomb Guard.
In combat the
Swordmasters on the left smashed the Casket pieces but lost four of their
number as it blew up, with the nearby Screaming Skull Catapult also taking a
wound. The Lion Chariot finished off the
catapult. On the right the Swordmasters
there destroyed the final Casket but the explosion from that took the last
wound from the Lion Chariot which in turn caused the Swordmasters on the left
to panic and flee off the board. The survivors in the other Swordmaster unit
reformed to face the Tomb Guard across the hill.
Tomb King turn five
saw the Tomb Guard charge the Eagle which fled – but not far enough to avoid
being caught. The Eagle’s death caused
the central unit of Reavers to panic and flee 11 inches. Meanwhile, the chariots moved round to try
and threaten my remaining Swordmaster unit.
High Elf turn five,
which proved to be the last of the game saw me edge the Swordmasters further
away from the hill, the fleeing Reavers rally while the other unit moved round
once more so they could target the chariots.
In the magic phase
I the Light Archmage kicked things off with Shem’s Burning Gaze at the Tomb
Guard which was dispelled. She followed
up with Banishment which turned five Tomb Guard to dust. A blast from the Ruby Ring of Rhuin hit but
one Tomb Guard and didn’t wound. Finally
she cast Net of Amyntok on the unit.
Shooting saw the Archers on the right shoot down a Tomb Guard.
That was the last
action of the game as we didn’t have time to complete turn six..
I don’t think I
need to tell you that this was a win for me, running out as a 15-5 in the
end. I’m not really sure what I’d have
done differently in this game to be honest since as far as I saw I had two
options, sit back and try and take out the ranged threat of the Skeleton
Archers with my own shooting, or push forward and try and get my movement
spells off to limit my exposure to that massed shooting.
Losing the second
Swordmaster unit to a panic check was annoying as with them still on the table
the result would have been a 17-3, which would have been worth a couple more
places in the final standings.
I must admit that
by this game I was definitely feeling a bit worn out and with all the noise in
the hall I didn’t realise when we started that Joe had rolled up Doom and
Darkness on both his level 2 Liche Priests.
It didn’t have an effect on the game fortunately.
Conclusion
So, where did I finish?
Going into the last game I was a bit worried that I might be on course
for the wooden spoon once more, although I hadn’t factored in the Tally Score
into my calculations. While I was
sitting on a -1, the person who was behind me was using a Host of the Phoenix
King Malekith list and was sitting on a -16 comp score and so would have had to
overcome a 17 point difference to overtake me.
In the end I ended up 55th which, while not exactly where
I’d have wanted to be, I couldn’t really complain about given the lack of
practice and not really running the sort of list I’d wanted to.
I also spent my second through fifth games
playing with a bit of an eerie feeling due to a picture that was on the wall
where the row I was playing on was. Take
a look at the picture below and tell me if I’m crazy or not when I say that it
was almost like having Obi Wan Kenobi watching over you for four games.
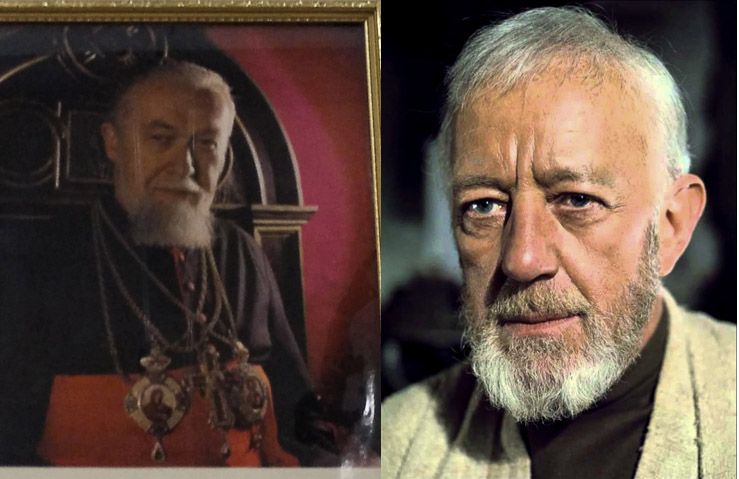
(As the venue was the social club attached to the local Ukrainian
church I’m assuming whoever the photo is actually of is/was someone of
importance in the Ukrainian church)
Overall though, aside from the couple of moments when my
general ran off the board or fell down a hole before doing much. I had fun at
the event, which is the main thing, and would definitely be back for another
event next year if it were to run.
Friday, 20 November 2015
Raze and Ruin 2015 Part 2
Game 2 – Luke Tranter – Legions of Chaos – Meeting Engagement
Somewhat to my
surprise, I wasn’t down on table 30 playing the spare player for game two –
apparently there were around four players who scored fewer victory points than
me in round one (I have it on good authority that someone had managed to get no
victory points at all) as I was on table 28.
I was also somewhat
fancying my chances when I saw what was essentially a Beastmen army in front of
me for this game, although Luke was running it as Legions of Chaos for the
Marks of Chaos on his units. End Times
shenanigans aside, my record against Beastmen prior to this game was pretty
good (one of the few armies I’ve beaten more than being beaten by). The only real fly in the ointment was the
random deployment rules for the scenario which had to the potential to be game
breaking depending on what did or, more
importantly, did not turn up.
Doombull (General)
- Mark of Tzeentch
- Heavy Armour
- Shield
Doombull
- Mark of Tzeentch
Gorebull
- Battle Standard Bearer
- Mark of Tzeentch
- Shield
5 Chaos Warhounds
30 Ungor Herd
- Full Command
5 Centigor
- Ghorros Warhoof
5 Centigor
- Mark of Khorne
5 Centigor
- Mark of Khorne
5 Centigor
- Mark of Khorne
6 Razorgor Herd
6 Razorgor Herd
Spells
Archmage - Lore of
High Magic
1 - Apotheosis
2 – Hand of Glory
3 – Walk Between
Worlds
4 – Arcane
Unforging
Archmage – Lore of
Light
1 – Shem’s Burning
Gaze
2 – Pha’s
Protection
3 - Banishment
4 – Birona’s
Timewarp
Deployment
The terrain for
this table had a wood about six inches from the left board edge and about ten
inches from my long board edge, with another wood about the same distance from
the short edge and roughly ten inches from Luke’s long table edge. Around six inches to the right of this second
wood, and an inch or two further from Luke’s board edge was a small hill and
then there was a larger hill about a foot further from the left than that and
just my side of the midline of the table. Four inches on from that was a small
water feature a bit more into my side of the table and another one four inches
on from that. Finally, there was another
small hill around twelve inches from Luke’s long board edge and roughly the
same distance from the right board edge.
As this was meeting
engagement we both had to roll off to see what units might fail to turn up to
the battlefield. With Luke deploying
first he rolled and everything bar his BSB turned up.
With the diagonal
deployment line running from my left corner to Luke’s left corner, Luke
deployed three of his Centigor units in a line to the right of the forest
nearest to me. The remainder of his units deployed right up against the 6” mark
from the mid-line and right up to his ling board edge. The units lining up from right to left were
one of the Razorgor herds, the Ungor, the second herd and then the Warhounds
with the remaining Centigor unit behind them.
At this point the characters who had turned up were in the Centigor.
Rolling for my
units everything turned up bar my two Swordmaster units, which needless to say totally
wrecked any plans I’d been making for how to deploy based on what Luke had been
putting down.
As I was without
the units I was counting on to do any damage, I deployed my Archer units
containing my characters towards the left of my deployment zone, together with
a unit of Reavers and a bolt thrower.
The Lion Chariot was on the right flank of the right hand Archers as I
didn’t want to put it somewhere it might struggle to make it into combat from. A unit of Reavers was on the hill with the
last unit a few inches across from
them. Both eagles were also in that area
so I could put them in place to divert the Razorgor units. The second bolt thrower was almost on the
board edge which was about the only place I could put it that gave me a couple
of different firing lanes.
Game
I failed to steal
first turn so over to Luke it was. He
took advantage of the closeness of the deployment to charge the unit of Archers
on left with the right hand unit of Centigor from the trio that lined up near the
wood, who lost one of their number to the Stand and Shoot charge reaction. The Centigor unit on the left next to the
wood also charged the same unit and made it in, unlike their colleagues. The left most unit of Razorgor charged the
central Reaver unit who fled, giving them the opportunity to redirect into the
other unit of Reavers who stood and shot to no effect.
The Ungor unit
wheeled round to face my lines better as they waited for the BSB to join
them while the other Razorgor started
edging their way up the board. The BSB
joined the unit of Warhounds who were walking up towards the hill.
With no magic phase
we were straight into combat where the Archers killed four Centigor and sent
the survivor running with his tail between his legs. The Reavers weren’t so lucky as they were
completely munched by the Razorgor without doing a single wound.
In my turn the
Reavers on the left charged the fleeing Centigor and redirected into what had
been the middle of the trio of Centigor units.
The Lion Chariot charged the fourth Centigor unit, with my hope being to
get it up behind the Beastman lines so I could start threatening to get it into
the flanks or rear of units.
Anticipating that
the threat from the Centigor was now mostly done, I moved the left unit of
Archers forward a bit while also repositioning the Archers on the right to
ensure the Archmage had the more concerning enemy in front of him. I brought one of the Swordmaster units on to
the right of this Archer unit and left them just a little way behind the rallied
Reavers. The other Swordmasters I
brought on to the right of the right-hand bolt thrower, being ready to push
them on and threaten the Razorgor, the closest unit of which I sought to hold
up somewhat with an Eagle.
My light Archmage
cast a Banishment on the unit of Warhounds with the BSB in, doing two wounds to
the Gorebull, whose armour proved resistant, but managing to wipe out the
Warhounds. The rest of my magic was
ineffective. The Archers on the left
shot at the unengaged Centigor whose armour blocked the shots, although the
nearby bolt thrower was more effective, killing two. The right unit of Archers shot at the nearest
Razorgor but didn’t do anything, as was the case with the other bolt thrower.
The Lion Chariot
smashed the Centigor it had charged into the ground and reformed to face the
Ungor and Razorgor, while the Reavers traded blows with the Centigor they were
fighting, with both units losing two models apiece. The Centigor held their ground.
Luke’s turn two saw
the Razorgor charge the blocking Eagle while the survivors of the Centigor
who’d been shot down to size the previous turn nipped round behind my unit of
Archers on the left. The Doombull General
moved out to threaten the Lion Chariot while the Ungor and second Razorgor unit
started moving towards the centre of the table.
In the magic phase
the Reign of Chaos roll was a five which saw the right hand Swordmasters and
the Lion Chariot hit but both made their armour saves. The Reavers fighting the Centigor failed to
fell their bestial foes and lost two of their number in reply, although the
survivor held. To my surprise the Great
Eagle did two wounds to the Razorgor but was killed in response.
My turn two and I
charged the Lion Chariot into the Doombull General while moving the remaining
Eagle to block the unit of Razorgor that had just done for its colleague. The unengaged Reavers moved out to the right
while the Swordmasters who’d been behind them moved up. The general and BSB left the Archer unit they
were in to join the Swordmasters and the Archmage in the Archers on the left
marched over to the unit on the right.
A 10 dice magic
phase saw me try to maximise the magic
output I had available. This started
with the Light Archmage casting Banishment on the Razorgor being faced down by
the Eagle. From eight hits the spell did
two wounds, which finished off the Razorgor wounded the previous turn. Pha’s was cast on the Lion Chariot to try and
give it some protection against the Minotaur.
The High Archmage attempted to cast Arcane Unforging on the Beastmen BSB
but this was dispelled. The Light
Archmage then attempted to cast Timewarp on the nearby Swordmasters but failed
to meet the casting rolling even using the Book of Hoeth. Finally the High Archmage used his Ruby Ring
of Ruin to do another two wounds to the nearest Razorgor.
Both Archer units
and the Reavers on the right flank tried to trim down the Razorgor herd further
but despite scoring 11 hits between them neither could pierce the beasts’
hide. The bolt thrower on the left slew
the Centigor sneaking round the back towards them. It was only the right hand bolt thrower that
managed to further injure the beasts.
In combat the
Reavers and Centigor did a wound apiece – this was enough to wipe out the
Reavers. The Lion Chariot failed to do
any wounds to the Doombull General and was killed in reply.
Beastmen turn three
and the surviving Centigor charged into the flank of the Archers on the left,
the Razorgor charged the Eagle in front of them while the Doombull General
charged the Archers on the right, The
Ungor and other Razorgor carried on moving up the table. Magic saw a roll of four on the Reign of
Chaos.
In combat the
Archers failed to do any wounds to the Centigor and despite being Steadfast
fled and were cut down. The Doombull cut
a bloody swathe through the Archers he was fighting but unlike their
compatriots, these Archers were made of sterner stuff and held. Finally, the remaining Eagle was cut down by
the Razorgor.
In reply my
Swordmasters kicked off their action with the unit on the right charging the
nearest Razorgor, who fled, leaving the Swordmasters moving forward six inches,
and the left unit of Swordmasters charging into the other Razorgor who were now
exposed to a charge. The Reavers moved
round to where they could see the fleeing Razorgor.
A middling dice
roll for the Winds of Magic meant I could only attempt two spells and so I cast
a boosted Hand of Glory onto Swordmasters fighting the Razorgor and Pha’s
Protection onto the same unit, which was stopped by the Beastmen dispel roll.
Shooting saw both
bolt thrower crews combine to shoot down the Centigor threatening the machines
on the left, while the Reavers failed to cause any more damage to the fleeing
Razorgor. The Archers unceremoniously
pushed forward the Light Archmage forward to challenge the Doombull which saw
her crushed beneath the beast’s hooves and giving a roll of seven on the Eye of
the Gods table. The sacrifice was not in
vain however, as the Archers managed to hold on to their courage at the site of
the wizard’s sacrifice and keep the Doombull in place.
The second combat
saw the Swordmasters beat the Razorgor, even with the Doombull in the unit but
unable to catch them as they fled, although the pursuit took them just far enough
to not be in the charge arc of the Ungor and end up not far behind the other
fleeing unit of Razorgor.
Both units of
Razorgor rallied in the Beastmen turn while the Ungor reformed to face the
flank of the Swordmasters. Reign of
Chaos was a score of 11, while the Doombull General finally cut through the
remaining Archers.
For my part I
declared a charge with the Reavers at the rearmost of the two Razorgor
units. With the Swordmasters highly
likely to chop through the other unit of Razorgor with an overrun that should
take them into the rearmost unit this left Luke with a choice of holding and
potentially lost both Razorgor units, or
fleeing – he chose to flee with that unit.
The Reavers re-directed into the other unit who then fled when the
Swordmasters charged them. The
Swordmasters failed to catch them but the Reavers had enough charge range to
reach and wipe them out.
So one Razorgor
unit was dead but I still had to consider the fact that the Swordmasters now
had the Ungor staring at tempting flank charge that would put them at a
distinct advantage in static combat res I’d have very little hope of overcoming
with just two Swordmasters and my general fighting to the flank. Therefore in the magic phase I cast a boosted
Walk Between Worlds to get them out of Dodge.
This ended up as an Irresistible Force and so the unit was able to make
a tactical withdrawal close to Luke’s board edge. Fortunately my Archmage didn’t drop down a
hole from the miscast result.
That just left the
shooting phase and both bolt throwers targeted the Doombull out on his own with
single bolts. One hit and didn’t wound while the other hit, wounded and caused
three wounds, taking him down to one.
Beastmen turn five
and the Doombull failed his Frenzy test, declaring a charge on the nearest
unit, which turned out to be the bolt thrower on the right. He failed to make it in, leaving himself a
target for the bolt throwers the next turn.
Meanwhile the fleeing Razorgor rallied and the Ungor turned about to
head towards my side of the table. Reign of Chaos ended up killing two of the Ellyrian
Reavers.
Over to my turn
five and my general’s unit edged away from the Razorgor while the Reavers
likewise put themselves out of a likely charge range. The other unit of Swordmasters also moved
backwards, putting them out of reasonable charge range of the Doombull. The bolt throwers both shot at the Doombull
but failed to hit him.
Restraining his
urges in turn six the Doombull decided not to try taking down one of the bolt
throwers but instead waited for the Ungor to catch up and then joined
them. A roll of nine on the Reign of
Chaos threatened the Reavers but the template scattered off them.
My last actions of
the game were to unload my shooting into the Ungor just for the hell of it.
All in I managed to
get 1045 points from Luke and gave up 1070, making the game a draw.
As I feared, the
random deployment element had a big effect on this game, although in hindsight
I realise that I threw away the potential chance of a win. With how the units were aligned when I moved
the general’s unit of Swordmasters with the boosted Walk Between Worlds,
instead of taking them into the top right corner out of the way, I should
instead have moved at full speed towards the Razorgor unit that was, at that
time, still fleeing. Looking at my
picture of the table I think I should have been able to finish the move out of
line of sight of the Ungor unit (which I’m guessing Luke might still have
turned round for his own general to bunker in rather than risk him being shot
down as well as losing the Razorgor and other Doombull). The Swordmasters should have done a number on
the Razorgor, enough to prevent too many attacks back, and the Doombull had a
magic weapon and so shouldn’t have done too much damage to the
Swordmasters. All in I think I would
have broken the unit and hopefully caught them.
Plus, I had the Reavers nearby to divert the Ungor should Luke not have
sent them to collect the general.
Another potential
mistake, although it panned out for me in game, was not moving the bolt thrower
on the right when the Doombull was within Frenzy check range. Had he charged in from Frenzy he would have
beaten the machine easily and then been right next to the Swordmasters. With his magic item and gift load out I
wouldn’t have fancied the Swordmasters’ chances of taking him on, especially
with all the bonus attacks he’d accrued through fighting the Archers earlier
on.
Furthermore, there
was always the chance that beating the bolt thrower might panic the Swordmasters
which could have seen them shepherded off the table.
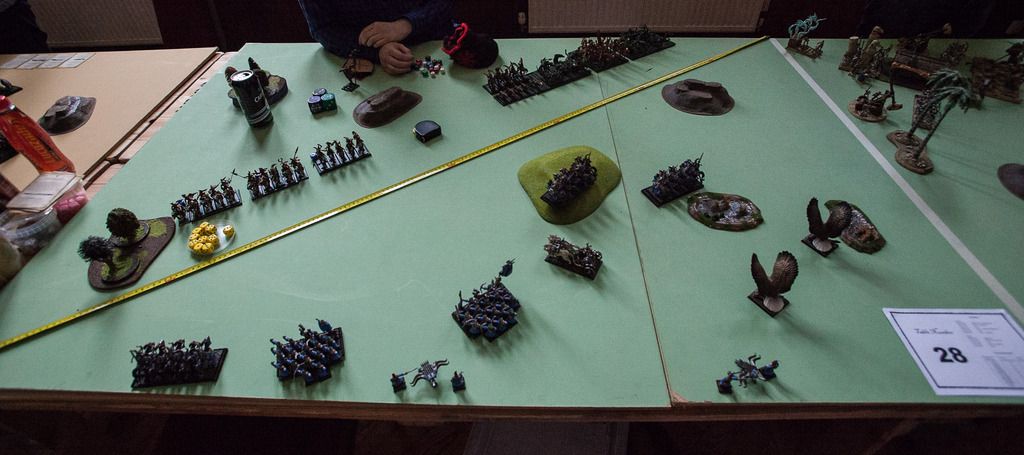
Game 3 – Terry Flaherty – Dwarfs – Battle
Line
I was now on table
26, edging away from the bottom. This
time around I was playing Dwarfs. With
my track record coming into the event I’d played Dwarfs five times (all at
tournaments funnily enough) and was so far three games to the good, although
I’d only played once against the 8th edition incarnation of the army.
For his part, Terry
told me he was usually competing for best Dwarf player at events he went to and
had been hoping to do the same at this event.
While I didn’t fancy his chances of winning best Dwarf player if he was
down this end of rankings in game three, it did mean I knew he’d probably be
taking best advantage of all the tricks in his list.
Dwarf Lord
- Shieldbearers
Runesmith
- Shield
Runesmith
- Shield
Thane
- Battle Standard Bearer
- Shield
Grim Burloksson
21 Quarrellers
- Full Command
- Shields
21 Quarrellers
- Full Command
- Great Weapons
26 Ironbreakers
- Full Command
Gyrocopter
Gyrocopter
Gyrocopter
19 Irondrakes
- Standard
- Musician
Spells
Archmage - Lore of
High Magic
1 – Soul Quench
2 – Apotheosis
3 – Hand of Glory
4 – Fiery
Convocation
Archmage – Lore of
Light
1 – Shem’s Burning
Gaze
2 – Pha’s
Protection
3 – Net of Amyntok
4 – Banishment
Deployment
On arriving on this table I did ponder for a few seconds
about asking Sandy if the terrain was all in the right place as my side of the
table was decidedly sparse; the sole piece of terrain was one of the small
hills about six inches from my left board edge and just in front of my
deployment zone.
Terry had the lion’s share of terrain with a large building
in his deployment zone’s left quadrant, a small rocky piece of terrain in his
right quadrant and a wood and hill just over the line for his side of the table, with the wood just
right of centre and the hill a few
inches on from that. There was also a
small wall about six inches back from the wood.
From left to right Terry had a Gyrocopter about four inches
to the left of the building, one unit of Quarrellers in the building with the
other unit to the right of it and a Gyrocopter in front of them. The Irondrakes went to the left of the wall
and the Ironbreakers behind the wall with the last Gyrocopter about six inches
to their right. For his characters, if I
remember correctly the Lord went in the Ironbreakers with the BSB and a
Runesmith while the other Runesmith and Grim
Burloksson joined the Irondrakes (although it’s possible the Runesmith was with
one of the Quarreller units).
For my part I put a
unit of Reavers and Archers on the left, leaving a big gap to the next unit of
Archers and then a gap of about four or five inches to another unit of
Reavers. The Lion Chariot was another
three inches further on and then the first of the Swordmaster units with the
general and BSB. The second Swordmaster
unit was about a foot away with the Light Archmage and then there was the last
unit of Reavers. Along the back board
edge was the first bolt thrower, a bit over a foot from the left board edge,
then one Eagle about seven inches along and a few in front, a few inches more
over to the last bolt thrower and then six or seven inches more to the last
Eagle.
With the main setup
complete we made our Vanguard moves. For
my part I ended up advancing the Reaver units on the flanks. I was unable to push the central unit up
where I’d wanted to as Terry had the Vanguard rune on his Irondrakes and
Ironbreakers and had pushed them up far enough that the last Reaver unit would
be coming within 12” of those units if I were to put them where I’d planned.
Game
I tried not to die of shock when I won the roll to go first
for once. Given that I was wary of the Gyrocopters
the only unit I really pushed forward was the right hand unit of Swordmasters,
although even then I think I may not have pushed them as far round as perhaps I
should as I was hoping to use the Light Archmage’s magic missiles on the
Gyros. The only other unit that really moved
was the right hand unit of Reavers who I moved up to threaten the right hand
Gyro.
In the magic phase my plan started off reasonably well as
the Light Archmage’s Burning gaze took two wounds off the nearest
Gyrocopter. A Banishment at the same
target drew out three dispel dice to stop it.
Next, wanting to start tipping the balance my way for the combat I was
expecting to come up, I cast Fiery Convocation on the Ironbreakers. Which went off with Irresistible Force. After managing to kill four from the spell’s
effects I rolled the miscast result which was a four. While I only lost one Swordmaster from the
blast, thanks to the Banner of the World Dragon, the general then fell down a
hole into the warp. Great…
Shooting saw the Reavers on the right fail to take the last
wound off the nearby Gyrocopter. The
Reavers in the centre shot at the Ironbreakers but failed to fell any while the
Reavers on the left shot at the Gyro by the building but failed to get through
the armour save.
The Archer units targeted the Quarrellers but managed to kill
a grand total of one.
In Terry’s turn he declared a charge with the Ironbreakers
on the Lion Chariot which held, only to see the Dwarfs fail their charge. The Irondrakes moved up into the wood in
support of their brethren. The
Gyrocopters started shifting to the right of the board, with the one by the
building ending up behind the Quarrellers in the open, the one in the middle
moving to the right of the wall and the last one moving for a flank shot down
the Reavers.
The Irondrakes took aim at the Lion Chariot and blew it to
pieces while the Gyrocopter shot down the Reavers to a man.
Turn two and I charged the general’s Swordmasters into the
Ironbreakers, hoping to keep them there long enough for the other unit to
charge into their flank as I moved that unit up at full speed into charge
range, although it wasn’t a sure thing.
The Reavers on the left I moved up to hopefully distract the Quarrellers
in the building while the Eagles were moved out to the right.
The Winds of Magic gave me a maximum dice phase which I
started off by casting Net at the Irondrakes.
The follow-up spell of a bubble Pha’s drew out a Rune of Spellbreaking.
Shooting saw the Reavers’ fire ineffective again as neither
unit managed to wound their targets. The
Archers were slightly more successful with two Quarrellers falling to their
arrows. Finally the Bolt Throwers fired
at the Quarrellers, managing to kill five.
Into combat and the Dwarf Lord declared a challenge, which
was accepted by the Swordmaster champion who managed to do a wound to the
stunty leader before being cut down. The
Swordmasters managed to do a further five wounds to the Dwarfs, taking only
five back in reply, although two of those were to my BSB who died. Overall the combat ended as a draw.
Dwarf turn two saw the Irondrakes edge forwards while one of
the Gyrocopters moved to block the charge of the Swordmasters into the flank of
the Ironbreakers.
Shooting saw the right unit of Archers shot to pieces. In combat the Swordmasters managed to do six
wounds, including one to the Ironbreaker champion to kill him, but took eight
in reply and broke, fleeing 11 inches, keeping just ahead of the pursuing
Ironbreakers.
Fortunately for me the Swordmasters rallied in my third turn
after one of the Eagles had charged the Gyrocopter blocking the other
Swordmaster unit and the Reavers on the left had charged the Quarrellers in the
building, more for the hell of it than any actual prospect of winning.
The surviving Archmage cast Shem’s Burning Gaze at the
Irondrakes which caused four hits and one wound which failed to get through the
armour. A Banishment at the same unit
was slightly more successful with the eight hits turning into three wounds and
two dead dwarfs. Pha’s was once again
stopped from being cast.
Shooting saw the Archer unit left finally start to get its
collective eye in as three Irondrakes were shot down, to be followed by another
one shot dead by one of the bolt throwers (the other bolt thrower failing to
wound at all). In combat the Reavers
bounced off the Quarrellers in the building while the Eagle failed to kill the
Gyrocopter but beat it on combat res and saw it flee into the wood behind the Irondrakes
where it lost its last wound to a dangerous terrain test.
The Eagles triumph was short-lived as it was killed by a
bombing run by one of the other Gyrocopters that was nearby. The Ironbreakers, meanwhile, had charged into
the recently rallied Swordmasters. The
other unit had been unnerved by the death of the Eagle and fled 6”, their state
of mind not helped by the other Gyrocopter that set itself up nearby to use its
steam gun on them.
In the shooting phase the Quarrellers targeted the Archers
who lost seven of their number. Combat
saw the Swordmasters put another wound on the Dwarf lord and one on the
Runesmith, as well as two rank and file slain but they lost seven of their own
number and fled four inches, failing to rally in my fourth turn.
Fortunately for my chances of getting anything out of the
game, the other unit of Swordmasters did rally, as did the fleeing
Reavers. Magic saw the Archmage
furiously casting magic missiles at the Ironbreakers with little effect: Shem’s
Burning Gaze causing no wounds, Banishment likewise ineffective and the Soul
Quench from his Khaine’s Ring of Fury bringing out the second Rune of
Spellbreaking.
My shooting also targeted the Ironbreakers who were now
depleted enough that any hits had to be specifically allocated to models. This saw an Ironbreaker die, a wound on the
BSB and the Runesmith dead.
Terry’s fourth turn saw the Ironbreakers declare a charge on
the nearest of their tormentors, the right hand bolt thrower but their little
legs couldn’t carry them that far and the charge fell short. The Irondrakes carried on their slow move
forwards along with a reform to ensure more of them could shoot, while both
Gyros lined up on the Swordmasters.
The Quarreller units combined to shoot dead the remaining
Archers while the Irondrakes shot at the right-hand bolt thrower and managed to
cause the requisite number of wounds to
kill the crew. The Gyrocopters managed
to kill 15 of the Swordmasters.
Passing their march test the Swordmasters headed closer to
the Irondrakes to get the Archmage in range for his spells. Starting with Banishment on the Ironbreakers,
the Dwarfs hurriedly dispelled that leaving the unit open to Shem’s Burning
Gaze, killing the last Ironbreaker and the BSB, leaving the Dwarf Lord all on
his own. Khaine’s Ring of Fury was fired
up once more, striking the Dwarf general and hitting him four times but only
wounding him once, a wound that was turned aside by his armour. With the last
magic die Pha’s Protection was cast on the Swordmasters.
The remaining shooting from the Reavers and bolt thrower
targeted the Dwarf Lord but could not find its way through.
Dwarf turn five and the Irondrakes reformed again to turn
round and extend their unit close enough to the Dwarf Lord that he could pump
his little legs hard enough to reach the relative safety of the unit. The Gyrocopters both flew out to the flank of
the Swordmasters again.
Shooting saw the Quarrellers wipe out the last unit of
Reavers while the Gyrocopters wiped out the last of the Swordmasters, leaving
the Archmage running for the board edge, only to rally in my sixth turn.
With eleven dice against six in my last magic phase the
Archmage cast Shem’s at the wound Gyrocopter, killing it. She then went on to cast Banishment on the
other Gyrocopter but see the hits fail to wound. The Ring of Fury bit out once more, doing two
wounds to the Gyro before the Archmage tried to protect herself with a Pha’s
again.
My last shooting of the game saw the last bolt thrower try
and shoot down the Gyro but it failed to wound, despite hitting it three
times. The Dwarf turn saw the Irondrakes
wheel round to get as many shots as possible at the Archmage and shot her down.
So this was another big defeat for the me, with nearly my
whole army taken off. At least this
time, however, I managed to give my opponent’s army a bit more of a bloody
nose, taking 975 points from Terry.
Under the amended 20-0 scoring in use that made the result and 18-2 to
Terry. Not a great result for me but I
was still doing better than my last Raze and Ruin (where my third game was also
an 18-2 loss, although that time around those were my first tournament points
of the event). Apparently I was the
first person to take down Terry’s Ironbreaker block so quickly which was some
consolation.
Overall the main thing I’d have done differently would have
been to move the Swordmasters on the right up and towards the Ironbreakers more
in turn one. I hadn’t expected the
Ironbreakers and Irondrakes to vanguard and I probably should have moved the
general’s Swordmasters and the Lion
Chariot towards the Ironbreakers, to make sure I could be confident of getting
both in on a turn two charge and then used the Reavers to block the Irondrakes
from shooting the Lion Chariot.
Hopefully that would have allowed me to combo charge with at least one
unit of Swordmasters and the Lion Chariot, rather than the general’s
Swordmasters going in solo.
Of course, it would also have helped if the general hadn’t
dropped down a hole with the first spell of the game that he cast.
Subscribe to:
Posts (Atom)